

Distillation Apparatus: Diagram, Parts and Working | LABIX Labware

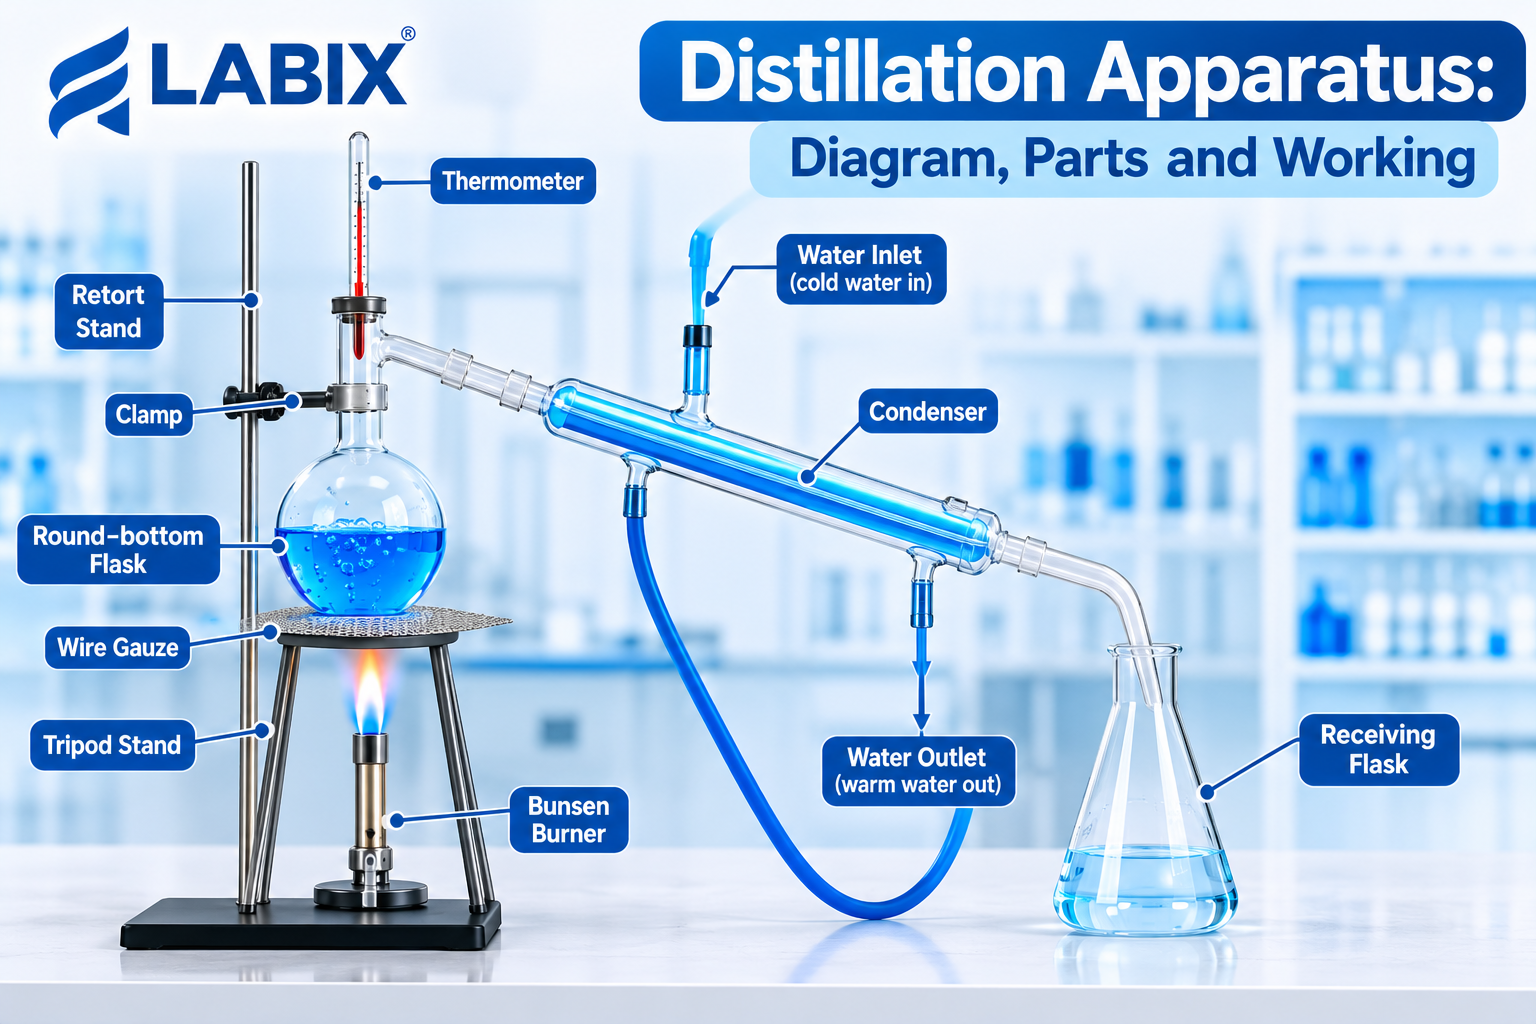
A distillation apparatus diagram shows in one picture how a liquid is heated, turned into vapour, cooled and collected as a purified liquid. LABIX Labware is a manufacturer and exporter of laboratory glassware based in Ambala Cantt, Haryana. It makes distillation assemblies, condensers and flasks for teaching, research and pharmaceutical laboratories, so this guide ties each part of the diagram to glassware you will actually handle at the bench.
Whether you are a student preparing for a practical exam, a technician assembling the setup, or a buyer comparing options, this article gives you a labelled diagram, a part-by-part explanation, a step-by-step account of how the process works, and practical advice on safety and selection.
Distillation Apparatus Diagram: A Labelled Simple Setup
Distillation separates liquids by boiling point. The mixture is heated, the component with the lower boiling point vaporises first, and the vapour is cooled back into liquid in a separate container. The simple distillation apparatus is the most basic form of this setup. It suits liquids whose boiling points differ substantially (a gap of roughly 25 °C or more is a commonly cited rule of thumb) or a liquid that must be separated from dissolved non-volatile solids.
Here is a image version of the standard layout. Use it as a reference, or ask your designer to turn it into a labelled illustration.
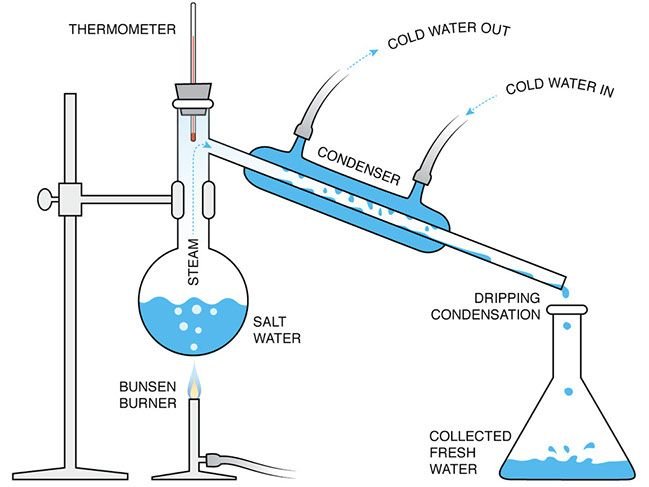
Read the diagram from bottom left to top right: heat goes in, vapour rises, the condenser cools it, and the distillate drips into the receiving flask. Every distillation setup, from a school demonstration to a pharmaceutical purification run, follows this path.
Parts of Distillation Apparatus and Their Functions
The main parts of distillation apparatus are few, but each one has a specific job. Knowing them also helps you troubleshoot problems such as slow collection, leaks or unstable temperature readings.
| Part | Function |
| Heat source | Supplies controlled heat to the flask |
| Round-bottom flask | Holds the mixture being distilled |
| Still head (splash head) | Directs vapour toward the condenser and holds the thermometer |
| Thermometer | Shows the vapour temperature at the point where it leaves the flask |
| Condenser | Cools the vapour so it returns to liquid |
| Receiver adapter | Guides the distillate from the condenser into the collection flask |
| Receiving flask | Collects the purified liquid |
| Clamps and stand | Hold the glassware steady and aligned |
Heat Source
Heating mantles, water baths, oil baths and hot plates are all used, depending on the liquid. For flammable solvents, choose a method without an open flame. Even heating also reduces bumping, which is the sudden, violent boiling that can throw liquid into the condenser.
Round-Bottom Flask
The round-bottom flask holds the liquid and spreads heat evenly across its curved base. Fill it to no more than about two-thirds of its capacity so the boiling liquid has room to rise. For setups that need a thermometer, condenser and addition funnel connected at once, a multi-neck flask is more convenient. LABIX Labware lists a round bottom three neck flask with side necks in angled or parallel configurations, in capacities from 100 ml to 20,000 ml.
Still Head and Thermometer
The still head, also called a splash head, connects the flask to the condenser and helps stop liquid droplets from being carried over with the vapour. The thermometer bulb should sit just below the side-arm opening so it reads the temperature of the vapour that is about to enter the condenser. A steady reading during collection usually indicates that one pure component is distilling.
Condenser
The condenser is where vapour turns back into liquid. In a jacketed design, cooling water flows through the outer jacket while the vapour travels through the inner tube. Water enters at the lower connection and leaves at the upper one, so the jacket stays full. If you want to compare Liebig, Graham, Allihn and Dimroth designs before choosing one, the LABIX Labware guide on types of laboratory condensers explains how each works and where it is best used.
Receiver Adapter and Receiving Flask
The receiver adapter, sometimes called a vacuum take-off or distillation adapter, directs the condensed liquid into the receiving flask. It also gives the system an opening so pressure cannot build up. A clean, dry receiving flask prevents contamination of the distillate.
Clamps, Stands and Tubing
The glassware needs support at the right points, with clamps tight enough to hold but not so tight that they stress the glass. Use flexible tubing for the water connections and secure it so it cannot slip off during the run.
Distillation Apparatus Working: Step-by-Step
The distillation apparatus working principle is simple: a liquid boils when its vapour pressure equals the surrounding pressure, and the more volatile component produces more vapour at a given temperature. Here is how a typical run proceeds.
- Assemble the setup. Connect the flask, still head, condenser, receiver adapter and receiving flask using matching ground glass joints. Check that all joint sizes (for example B 19 or B 24) are compatible.
- Load the flask. Add the mixture and a few boiling chips or a magnetic stirrer bar to promote smooth boiling.
- Start the cooling water. Turn it on before heating, and keep the flow steady.
- Begin heating gradually. Raise the temperature slowly until the liquid begins to boil.
- Watch the thermometer. Vapour rises, the reading climbs and then stabilises as the first component distils.
- Collect the distillate. Condensed liquid drips into the receiving flask. Change the receiver if the temperature rises sharply, since a second component may be starting to distil.
- Stop before the flask runs dry. Remove the heat source, let the apparatus cool, and only then switch off the water and dismantle the glassware.
Impurities with higher boiling points stay in the flask while the purified liquid collects in the receiver. That is the full process in short: heat, vaporise, condense, collect.
Laboratory Distillation Apparatus: Simple, Fractional and Vacuum Types
Not every separation can be done with a basic setup, so it helps to know how the common types of laboratory distillation apparatus differ.
| Type | Best used for | Main addition |
| Simple distillation | Liquids with widely separated boiling points, or separating a liquid from dissolved solids | None; basic setup |
| Fractional distillation | Liquids with closer boiling points | Fractionating column between flask and still head |
| Vacuum distillation | Heat-sensitive or high-boiling liquids | Vacuum source and suitable high-vacuum components |
In simple distillation, the straight inner tube of a Liebig design lets the condensate drain freely, which is why it is a common choice. LABIX Labware’s Liebig condensers are listed with B 14, B 19, B 24 and B 34 joints and effective lengths from 150 mm to 900 mm, so you can match the condenser to your flask size and heat load. For closer-boiling mixtures, a fractionating column adds repeated vaporisation and condensation steps. LABIX Labware’s catalogue includes a separate fractionating column category for this purpose.
Some mixtures form azeotropes, meaning they boil at a fixed composition and cannot be separated fully by ordinary distillation. Check the method for your specific mixture before choosing the setup.
Safety and Care When Using Distillation Glassware
Distillation involves heat, vapour and glass, so a few habits matter every time:
- Never heat a closed system. Always leave an outlet so pressure cannot build.
- Inspect the glass before use. Chips, star cracks and weak joints can fail under thermal stress.
- Avoid distilling to dryness. Some liquids, such as ethers, can form peroxides that become hazardous when concentrated.
- Keep flammable vapours away from ignition sources. Work in a well-ventilated space or fume hood.
- Support the glassware properly. Use clamps and stands that hold the apparatus without twisting the joints.
- Check chemical safety data. Follow the safety data sheet for each liquid and your laboratory’s procedures.
After use, let the glass cool naturally, rinse it, and store it where it cannot be knocked over. These are general guidelines, so always follow your laboratory’s rules and the manufacturer’s instructions.
How to Choose a Distillation Apparatus Manufacturer in India
If you are sourcing glassware for a school, research or pharmaceutical laboratory, the right distillation apparatus manufacturer in India should be able to answer practical questions clearly. Use this checklist:
- Material: Is the glass borosilicate, and does the specification say which grade?
- Joint standards: Do the ground glass joints match your existing glassware?
- Capacity range: Are flask sizes available for both teaching and larger-scale work?
- Completeness: Does the assembly include the still head, condenser and receiver adapter, or must they be bought separately?
- Documentation: Can the supplier share a specification sheet or product details before you order?
- Customisation: Can the supplier adapt joint sizes or dimensions if your method requires it?
LABIX Labware supplies both individual components and ready-made sets. Its Distillation Assembly (Model 1365) is made from borosilicate glass 3.3 and includes a 2000 ml round-bottom flask, a splash head, a double surface condenser and a receiver adapter, all with ground glass joints. The same assembly is also listed with 5-litre and 10-litre flask capacities for larger work. Because the parts are supplied together, they are designed to fit one another, which saves time on compatibility checks.
For purchase queries, confirm the exact capacity, joint sizes and availability directly with the LABIX Labware team before ordering.
Frequently Asked Questions
What is a distillation apparatus used for?
It separates and purifies liquids based on differences in boiling point. Common uses include purifying solvents, separating a liquid from dissolved solids, and preparing distilled water in teaching and research laboratories.
What are the main parts of distillation apparatus?
The main parts are a heat source, round-bottom flask, still head, thermometer, condenser, receiver adapter and receiving flask, held in place by clamps and stands.
Why does water enter the condenser from the bottom?
Bottom entry fills the jacket from below, which keeps the cooling surface covered and avoids air pockets. Follow the manufacturer’s instructions for your specific condenser.
What is the difference between simple and fractional distillation?
A simple distillation apparatus has no column and suits liquids with widely separated boiling points. Fractional distillation adds a fractionating column, which improves separation of liquids with closer boiling points.
Why are boiling chips added to the flask?
Boiling chips provide surfaces for bubbles to form, which promotes smooth boiling and reduces bumping. A magnetic stirrer bar can do the same job.
Conclusion
A distillation apparatus diagram makes the whole process easy to follow: heat the flask, vaporise the liquid, condense the vapour and collect the distillate. Understanding each part helps you assemble the setup correctly, spot problems early and choose glassware that fits your method. Match joint sizes, check capacity and follow safety procedures every time. If you are planning to buy a complete set or individual components, you can explore the distillation assemblies from LABIX Labware and send an enquiry with the sizes you need.